Our web browsers (Chrome, Firefox, Safari, etc.) can only run Javascript code. Javascript is notoriously slow when compared to compiled languages like C/C++, Rust, Java, etc. Running intensive and complex code on the browser with javascript will inevitably lead to extremely slow performance and unresponsive UI. One way to mitigate this issue is to run all the intensive code on the server and send the results back to the browser. This leads to extreme stress on the servers. Scaling becomes an issue when there are many users on our website which leads us back to same issue as above.
Edge deployment to the rescue. Deploying directly on the user's device (browser, phone, etc.) brings several benefits over remote deployments. It eliminates the need to send data to a remote server. Reduces network latency which is essential for time-sensitive applications. Privacy risks are reduced since data never leaves the user's device. The application works even if the device is offline. Edge deployments have been gaining traction in the last few years. The greatest impetus came in the form of WebAssembly.
WebAssembly (Wasm) is a binary instruction format that enables high-performance code to run in web browsers and other environments. Essentially, it allows developers to write code in faster, high-performance languages like C/C++, Rust, etc. (instead of javascript) and deploy the application directly on a web browser. This brings in near-native speeds i.e. speeds similar to apps running directly on our laptops. In this post, we'll create a simple page that lets users run convolutions on images.
We will need the Emscripten C++ compiler and the Eigen library to work with matrices. Hopefully, you have an understanding of C++ & Javascript.
We will be creating 2 files
- wasm.html - an HTML file with some JS to serve our application
- wasm.cpp - the C++ code for convolving the images
Create a new directory with the wasm.cpp & wasm.html files.
#include <stdio.h>
#include <emscripten.h>
#include <Eigen/Dense>

using Eigen::MatrixXi;
using Eigen::MatrixXf;

MatrixXf ptrArrToMatrix(float* arrPtr, int cols, int rows ){
    //convert pointer to int vector
    std::vector<float> floatVec(arrPtr, arrPtr+(rows*cols));

    //create Matrix from intArr
    Eigen::MatrixXf m = Eigen::MatrixXf::Map(floatVec.data(), rows, cols);

    return m.transpose();
}

void matrixToPtrArr(int* matArr, MatrixXf floatMat){
    Eigen::MatrixXi mat = floatMat.cast <int> ();
    typedef Eigen::Matrix<int,Eigen::Dynamic,Eigen::Dynamic,Eigen::RowMajor> RowMajMat;
    RowMajMat::Map(matArr, mat.rows(), mat.cols()) = mat;
    // for(int i=0; i< mat.size(); i++) print(matArr[i]);
    return;
}

void rgba2gray(uint8_t* rgbPtr, int width, int height, float* grayPtr) {
    for(int i=0;i<(width*height*4); i+=4){
        grayPtr[int(i/4)] = 0.299*rgbPtr[i] + 0.587*rgbPtr[i+1] + 0.114*rgbPtr[i+2];
    }
}

MatrixXf conv2d(MatrixXf image, MatrixXf filter){
  int f_rows = filter.rows();
  int f_cols = filter.cols();
  if ((f_rows != f_cols) || (f_rows%2 == 0)){
    throw "invalid dimensions";
  }
  MatrixXf padded_img = add_padding(image, int(f_cols/2), int(f_rows/2));
  MatrixXf conv_img(image.rows(), image.cols());

  for (int r=0; r<(padded_img.rows()-f_rows+1); r++){
    for (int c=0; c<(padded_img.cols()-f_cols+1); c++){
      conv_img(r,c) = filter.cwiseProduct(padded_img.block(r,c,f_rows,f_cols)).sum();
    }
  }

  return conv_img.cwiseAbs();
}
The wasm.cpp files starts with all header inclusions. The emscripten runtime and the Eigen DenseMatrix implementations. The ptrArrToMatrix & matrixToPtrArr functions are used to convert our image data from browser specific image blob to a C++ pointer array. There are some other utility functions like rgba2gray to convert the image to grayscale. The conv2d function is where the magic happens. It takes 2 params -> the image & the convolution filter; and convolves the filter with the image . Both params are Eigen:MatrixXf (float matrix of arbitrary dimension). Unfortunately, there is no way for us to directly call these functions on the browser. We need to create an interface for the javascript code to call our C++ functions.
extern "C" {

    EMSCRIPTEN_KEEPALIVE
    uint8_t* create_buffer(int width, int height) {
        // RGBA = 4 channels * 8-bit integers
        return (uint8_t*)malloc(width * height * 4 * sizeof(uint8_t));
    }

    EMSCRIPTEN_KEEPALIVE
    void destroy_buffer(uint8_t* p) {
        free(p);
    }

    EMSCRIPTEN_KEEPALIVE
    void img_logic(uint8_t* p, int width, int height, int* outputPtr) {
        // create a placeholder pointer array for our image and convert to grayscale
        float* grayPtr = (float*) malloc(width*height*sizeof(float));
        rgba2gray(p, width, height, grayPtr);
        // convert pointer array to Eigen matrix
        MatrixXf mat = ptrArrToMatrix(grayPtr, width, height);
        // de-allocate the original pointer memory
        free(grayPtr);
        // perform the convolution
        MatrixXf sobelMat = conv2d(mat,sobel());
        // convert matrix back to pointer array
        matrixToPtrArr(outputPtr, sobelMat);
        return ;
    }
}
The extern C block allows us to expose our C++ functions. The functions defined in this block can be called directly on the browser. Our main focus is the img_logic function which allocates memory for our image, converts the data to a matrix, performs the convolution and converts the result back to a pointer array. This function is calling all the functions we defined earlier. Lets go ahead & compile this C++ file. Your Eigen library files should be in the ./include directory.
em++ -I ./include/ wasm.cpp -o wasm.js -O2 -s WASM=1 -s ALLOW_MEMORY_GROWTH=1 -s
This command will create a wasm.js file which will be included in our HTML file.
Let us now turn our attention to the HTML file which will be serving our image convolution code. Create a basic HTML file with all boilerplate tags. Add in a script tag to include our wasm.js file. Add an image tag which will act as the input image for our convolution function. We also need a button to call our code. The HTML file would look something like this.
<script src="wasm.js"></script>
<script>
const api = {
    create_buffer: Module.cwrap('create_buffer', 'number', ['number', 'number']),
    destroy_buffer: Module.cwrap('destroy_buffer', '', ['number']),
    img_logic : Module.cwrap('img_logic', null, ['number','number','number','number']),
}

async function loadImage(src) {
    // Load image
    const imgBlob = await fetch(src).then((resp) => resp.blob());
    const img = await createImageBitmap(imgBlob);
    // Make canvas same size as image
    const canvas = document.createElement('canvas');
    canvas.width = img.width;
    canvas.height = img.height;
    // Draw image onto canvas
    const ctx = canvas.getContext('2d');
    ctx.drawImage(img, 0, 0);
    return ctx.getImageData(0, 0, img.width, img.height);
}

function pressBtn(){
    main();
}
async function main() {
    // Load image, create buffer pointing to data
    const image = await loadImage('/forest.jpg');
    const p = api.create_buffer(image.width, image.height);
    console.log("w,h", image.width, image.height);
    Module.HEAPU8.set(image.data, p);

    // ... logic ...
    var imgPtr = Module._malloc(image.width * image.height * 1); // 1 byte = size of int8
    api.img_logic(p, image.width, image.height, imgPtr);
    const resultView = new Uint32Array(Module.HEAPU32.buffer, imgPtr, (image.width*image.height));
    const result = new Uint8Array(resultView);
    api.destroy_buffer(p);

    // create off-screen canvas element
    var canvas = document.createElement('canvas'),
    ctx = canvas.getContext('2d');
    canvas.width = image.width;
    canvas.height = image.height;
    // create imageData object
    var idata = ctx.getImageData(0,0, image.width, image.height);
    // manipulate pixel elements to create 4 channels - rgba
    for (var i = 0; i < idata.data.length; i += 4) {
        idata.data[i] = result[parseInt(i/4)];
        idata.data[i + 1] = result[parseInt(i/4)];
        idata.data[i + 2] = result[parseInt(i/4)];
        idata.data[i + 3] = 255;
    }
    // update canvas with new data
    ctx.putImageData(idata, 0, 0);
    // create a new img object
    var mod_image = new Image();
    // set the img.src to the canvas data url
    mod_image.src = canvas.toDataURL();
    document.body.appendChild(mod_image);
    // document.body.appendChild(canvas);
    Module._free(imgPtr);
}
</script>

<button onclick="pressBtn()">Click me!</button>
The api constant defines all the callable C++ functions with their parameters, datatypes & returning types. The loadImage function loads the image as a blob in 8bit format. We convert to 32 bit float in our C++ code. The main function is where we define our main logic. We load our image and allocate a buffer pointing to the image data. We create another buffer for our processed output image. Our main img_logic function takes 4 arguments; input image buffer, image width, height & output image buffer. Our img_logic function takes the input image, performs the convolution and stores the processed image in the output buffer. The Javascript code picks up the processed image from the output buffer imgPtr. We create another canvas element to display the image in the required 8bit format. We finally free all our allocated memory.
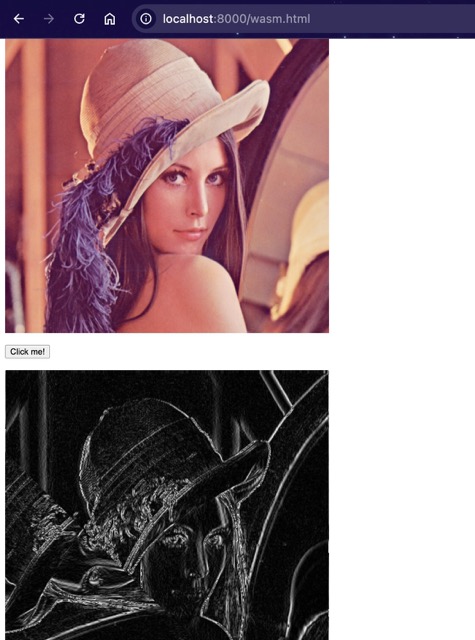
This should give you a basic understanding of how we can perform some basic image processing with WebAssembly. In our next post, we will write code for a simple CNN. Ciao!